
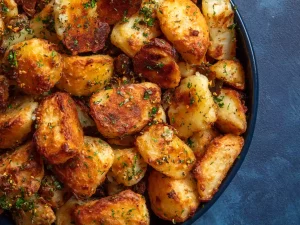
These are the most flavorful crispy roast potatoes you’ll ever make. And they just happen to be gluten-free and vegan (if you use oil) to boot.
WHY THIS RECIPE WORKS
Large chunks of potato maximize the contrast between exterior and interior.
Parboiling the potatoes in alkaline water breaks down their surfaces, creating tons of starchy slurry for added surface area and crunch.
Offering you the choice of oil, duck fat, goose fat, or beef fat means you can get whichever flavor you want.
The Brits get a bad rap for their cuisine, and in some cases rightfully so—the beef cooked until gray and the gravy-made-from-granules that I ate every Sunday while staying in England were not the height of culinary greatness— but dang if there aren’t a lot of things they do better than almost anyone else. I’m talking savory pies, fried fish, Yorkshire puddings, and roasted potatoes. The British method of roasting potatoes is one that I’ve taken a strong liking to. It’s simple, and it produces amazing results. Boil chunks of potato until they’re just tender, toss them none-too-gently with fat (ideally beef drippings) to rough up their surface, then roast them until they’re crisp and crackling.
Crispy Roast Potatoes Recipe:
Ingredients:
- Potatoes (russet or Yukon Gold), peeled and cut into evenly sized chunks
- Olive oil or duck fat
- Salt
- Black pepper
- Optional: Fresh herbs (rosemary, thyme, or sage), minced garlic, or other seasonings of your choice
Instructions:
- Preheat the Oven: Preheat your oven to 425°F (220°C).
- Parboil the Potatoes: Place the peeled and cut potatoes in a large pot of cold, salted water. Bring the water to a boil and let the potatoes cook for about 5-7 minutes, just until they are slightly tender but not fully cooked. Drain the potatoes and let them sit in the colander for a few minutes to steam dry.
- Fluff the Potatoes: Gently shake the colander to roughen up the edges of the potatoes. This will create a rough surface that will become crispy when roasted.
- Coat with Fat: In a roasting pan or baking sheet, drizzle a generous amount of olive oil or duck fat. You can also use a mixture of both for added flavor. Heat the pan in the oven for a few minutes until the fat is hot.
- Add Potatoes: Carefully add the parboiled potatoes to the hot fat in the roasting pan. Turn and coat the potatoes in the fat, making sure they are evenly coated. Spread them out in a single layer, leaving some space between each potato.
- Season: Sprinkle the potatoes with salt, black pepper, and any other desired seasonings or herbs. Toss them gently to ensure even seasoning.
- Roast: Place the roasting pan back in the oven and roast the potatoes for about 40-50 minutes, turning them every 15-20 minutes. This will help them cook evenly and become crispy on all sides.
- Serve: Once the potatoes are golden brown and crispy on the outside, remove them from the oven. Transfer them to a serving dish and let them rest for a minute or two before serving.
Notes:
- Potato Variety: Choose starchy potatoes like russet or Yukon Gold for the fluffiest interior and crispiest exterior.
- Parboiling: Parboiling the potatoes helps create a soft interior while the roughed-up edges get crispy during roasting.
- Roughing Up: Shaking the colander after parboiling creates a rough texture on the potato surface, which enhances crispiness.
- Hot Fat: Preheating the fat in the roasting pan ensures the potatoes start crisping up immediately upon contact.
- Spacing: Make sure the potatoes are not crowded on the roasting pan. Giving them space helps them roast evenly and become crispy.
- Seasoning: Feel free to get creative with seasonings – garlic, herbs, or spices can add depth of flavor.
- Turning: Turning the potatoes during roasting helps them cook and brown uniformly.
- Resting: Allowing the potatoes to rest briefly after roasting helps the crispiness set and any excess fat to drain off.
Enjoy your delicious crispy roast potatoes!
The boiling and roughing-up steps are the real keys. They create a thin slurry of mashed potato that clings to the surface of the potato chunks, which ends up crisping beautifully in the oven as the potatoes roast. It’s the technique I use for the Ultra-Crispy Roast Potatoes recipe I published back in 2011, and the technique I use for pretty much every holiday.
This year, I decided to reexamine the method from the ground up with the idea of completely maximizing that crisp-to-creamy contrast in each chunk of roast potato, testing and retesting every variable, from cut size to potato type to boiling and roasting methods. The result is this recipe, which I firmly and un-humbly believe will deliver the greatest roast potatoes you’ve ever tasted: incredibly crisp and crunchy on the outside, with centers that are creamy and packed with potato flavor. I dare you to make them and not love them. I double-dare you.
Here’s how the testing went down.
Choosing the Right Potato Size and Variety
First things first: Let’s talk about size. In my original roast-potatoes recipe, I cut the potatoes into smallish, two-inch chunks. This time around, I wanted to maximize the contrast between the center and the exterior even more, so I decided to leave the potatoes in really large chunks. A full quarter of a potato each. That means each chunk turns into a two-biter, but it makes it easier to crisp them up.
For variety, I tried the three most common supermarket types: russet, Yukon Gold, and red.
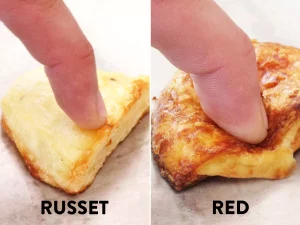
Moral of the story: Skip the reds. Stick with russets or Yukon Golds (or a mix!).
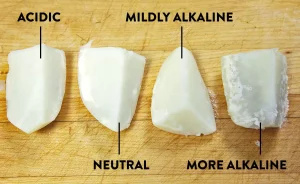
Playing With pH: Why You Should Add Baking Soda to Your Water
In my previous roast potato recipe, I recommended adding a splash of vinegar to the water for the initial boil. The idea is to control the breakdown of pectin, the cellular glue that holds vegetables together. Think of it as the mortar between bricks.
Pectin begins to break down at around 183°F (84°C), but its breakdown is also greatly affected by the relative pH of the cooking medium. The lower the pH (i.e., the more acidic), the less it breaks down. Conversely, the higher the pH (i.e., the more alkaline), the faster it breaks down.
To demonstrate this, I cooked four potatoes in water at various pH levels, ranging from slightly acidic to neutral to very alkaline. You can clearly see that the potatoes boiled in more alkaline water have started to break down more than those boiled in acidic water.
Which way is better? Well, with the smallish potato chunks in my original roast potato recipe, adding a splash of vinegar can help prevent the potatoes from accidentally falling apart completely while you are tenderizing them. Similarly, I add a splash of vinegar to my French fries to get them to cook fully without collapsing.
But with a different form factor comes a different set of rules. Is vinegar still the best pH modifier for the job with the huge, chunky potatoes I’m using here?
Leave a Reply