
Effortless Canning: The DIY Chopper Bucket for Streamlined Tomato Preparation
Tired of constantly emptying your chopper while dicing tomatoes for canning? Our resourceful canning enthusiast shares a brilliant solution:
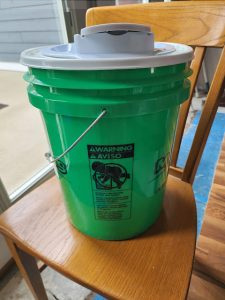
a customized chopper bucket that holds a whopping 19 quarts of diced tomatoes. With the help of a supportive partner, they created this game-changing tool from a new bucket and lid, revolutionizing their tomato preparation process. Join us as we explore the step-by-step instructions for constructing this DIY chopper bucket and discover how it has taken their canning endeavors to a whole new level of efficiency.
Recipe: Dicing Tomatoes with the DIY Chopper Bucket
Materials Needed:
- – New bucket and lid (food-grade and designated for canning) from Amazon: Bucket and lid
- – Chopper with an edge (preferably one with multiple blade options) u can order from Amazon: MegaChef Dicer and Chopper Veggie
- – Drill with pilot hole bit, Get it Now from Amazon: Drill with pilot hole bit
- – Scroll saw, Amazon: Scroll saw
- – Marker or pen for tracing, from Amazon: Marker or pen for tracing
Instructons:
1. Acquire a new bucket and lid:
– Purchase a new bucket and lid from a local home improvement store, ensuring they are food-grade and suitable for canning purposes.
– Clean the bucket and lid thoroughly to remove any dust or debris.
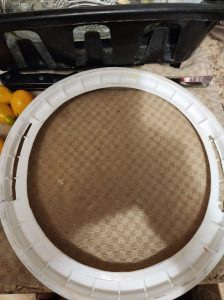
2. Trace the chopper shape onto the lid:
– Place the lid of the bucket on a flat surface.
– Take your chopper and position it upside down on the lid, aligning it to the desired cutting area.
– Use a marker or pen to trace the shape of the chopper onto the lid.
3. Drill pilot holes for the saw blade:
– Using a drill with a pilot hole bit, carefully drill holes along the traced lines on the lid.
– These pilot holes will provide an entry point for the scroll saw blade during the cutting process.
4. Cut the chopper shape with a scroll saw:
– Take a scroll saw and insert the blade into one of the pilot holes.
– Following the traced lines, slowly and carefully cut out the shape of the chopper on the lid.
– Exercise caution to ensure that the shape is not cut too large, as it should securely hold the chopper without it slipping through.
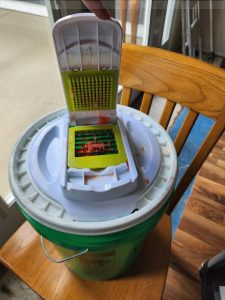
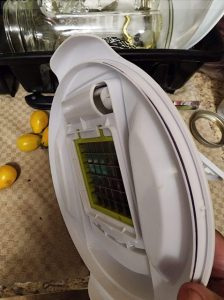
5. Secure the chopper in place:
– Place the chopper blade-side down through the opening on the lid.
– Ensure that the chopper fits snugly in the cut-out area, with the lid holding it securely.
6. Dicing tomatoes with the DIY chopper bucket:
– Prepare your tomatoes for dicing by washing and removing any stems or blemishes.
– Take a batch of tomatoes and place them inside the bucket, filling it up to the desired level.
– Position the lid with the chopper securely onto the bucket, ensuring a tight seal.
– Holding the bucket firmly, shake or rotate it gently to allow the chopper blades to dice the tomatoes.
7. Enjoy the efficiency and convenience:
– Experience the game-changing efficiency of the DIY chopper bucket as it significantly reduces the frequency of emptying the chopper while dicing tomatoes.
– Continue dicing tomatoes in batches, emptying the diced ones into containers for canning or further processing.

With a stroke of ingenuity and the support of a handy partner, our canning enthusiast has crafted a DIY chopper bucket that revolutionizes the tomato preparation process.
By repurposing a new bucket and lid, they have created a game-changing tool that holds an impressive 19 quarts of diced tomatoes. With the chopper securely positioned in the custom-cut lid, dicing tomatoes has never been easier or more efficient. Embrace this ingenious canning hack and enjoy the seamless tomato preparation experience that the DIY chopper bucket offers. Say goodbye to frequent emptying and hello to a whole new level of efficiency in your canning adventures.
Leave a Reply